About the Button Huggie
The Button Huggie® project was started in 2016 by Dr. Steve Moulton, a pediatric surgeon at Children’s Hospital Colorado. It was born from the frustration of dealing with a multitude of gastrostomy button related problems on an almost daily basis, the clear absence of a solution, and the knowledge that a growing number of children and adults are living with low profile enteral access devices. It all started with two grants from the CU Department of Surgery, which enabled Dr. Moulton to sponsor a group of graduate students in the Department of Mechanical Engineering at University of Colorado Boulder. It was there that Dr. Moulton met Tyler Mironuck, one of the graduate students on the project, who immediately shared the same passion and unique vision for solving the complicated issue at hand. After four years of development, Dr. Moulton and Mr. Mironuck formed EZaLife, LLC to bring the Button Huggie® to market.

The Science
Ten years ago, 50-60% of children who had creation of a gastrostomy underwent percutaneous endoscopically guided (PEG) gastrostomy tube placement. Nowadays, laparoscopic primary g-button placement has largely supplanted PEG placement, due to fewer major post-operative complications. Unfortunately, complications do still persist with g-button placement, which include pain and discomfort, leakage, infection, granulation tissue formation and accidental dislodgement. While the exact causes for these symptoms vary, it is theorized that lack of g-button stability is a primary factor. When a g-button is exposed to external forces (clothes catching, accidental hand swipe, etc.) and human-related forces (twisting of the abdomen, skin folding, coughing, etc.), there is shearing between the g-button and the skin and widening of the stoma.
We believe inhibiting movement of the g-button relative to the surrounding skin will reduce the chances of accidental dislodgement and lessen stress on the stoma, so that the gastrostomy tract can heal faster, reducing the risk of post-operative complications.


The current Standard
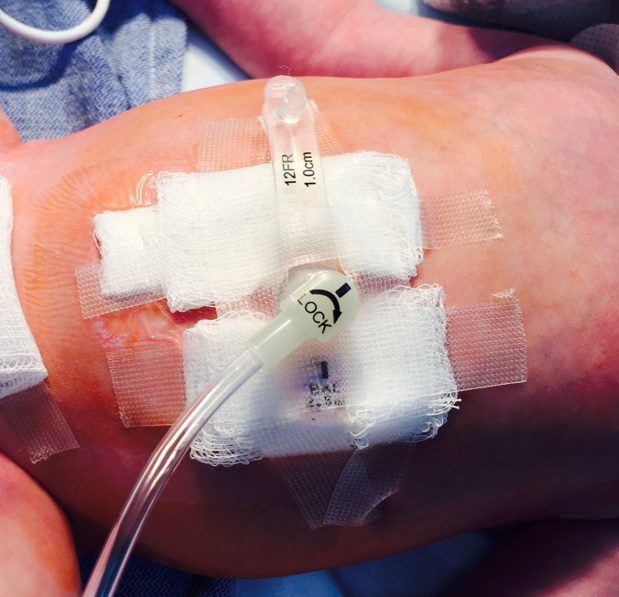
The most common method to secure a g-button consists of two 2x2 inch pieces of gauze placed under the button, both of which are then secured with tape; this is known as the tic-tac-toe dressing.
While this dressing provides some stability to the button, it fails to address many of the issues associated with g-buttons, and even creates some issues of its own. The tic-tac-toe dressing needs to be changed frequently: a process that not only takes significant time, but can also irritate the skin due to repeated application and removal of the tape. Because the dressing provides limited reduction of external forces, movement of the g-button can lead to a variety of common and distressing complications.
The Button Huggie Solution
With no product on the market to reliably secure gastrostomy buttons and address the myriad of problems associated with healing of the gastrostomy tract, we decided to invent one. Over 500 design iterations and two small clinical trials of prototype devices have led to the first gastrostomy button securement device on the market, the Button Huggie®.
The Button Huggie® is comprised of 3 primary components. The top layer is a washable, reusable lid, which helps to reduce cost and lower the impact of plastic on the environment. The middle layer is a highly absorbent, biodegradable, replaceable gauze sponge. Finally, the base layer is a uniquely contoured semi-rigid supportive structure bonded to a long-wearing, silicone-based 3M® adhesive.


Painless Gauze Replacement

A defining feature of the Button Huggie® is how it simplifies replacement of the absorbent gauze sponge. This was achieved by incorporating a lid that can be opened to provide easy access to our custom gauze pad. The caregiver or patient can then simply slide out the soiled gauze and replace it with a new, sterile gauze pad. Closing the lid keeps the gauze pad secured under the g-button, while also providing an extra layer of protection from external forces.
The inner structure of the base layer acts as a holster for the g-button—always keeping it stable. It also facilitates replacement of the gauze pad under and around the g-button--a process that is quite cumbersome with the tic-tac-toe dressing. The 3M® adhesive allows the Button Huggie® to be worn on the body for up to seven days. Once the adhesive wears out, the device needs to be removed from the body the base layer replaced. This means that the adhesive only needs to be removed from the skin once per week, compared to sometimes multiple times per day with the tic-tac-toe dressing.
Child-Resistant
The lid and base layer are attached to one another by pulling the lid into the recess at the back of the base layer. While the lid can be opened and closed to replace the gauze pad, it can only be fully removed from the base layer once the whole device is off the body. This creates a child-resistant hinge, which is particularly important in that it mitigates the risk of a choking hazard when used for pediatric patients.

360 degree protection
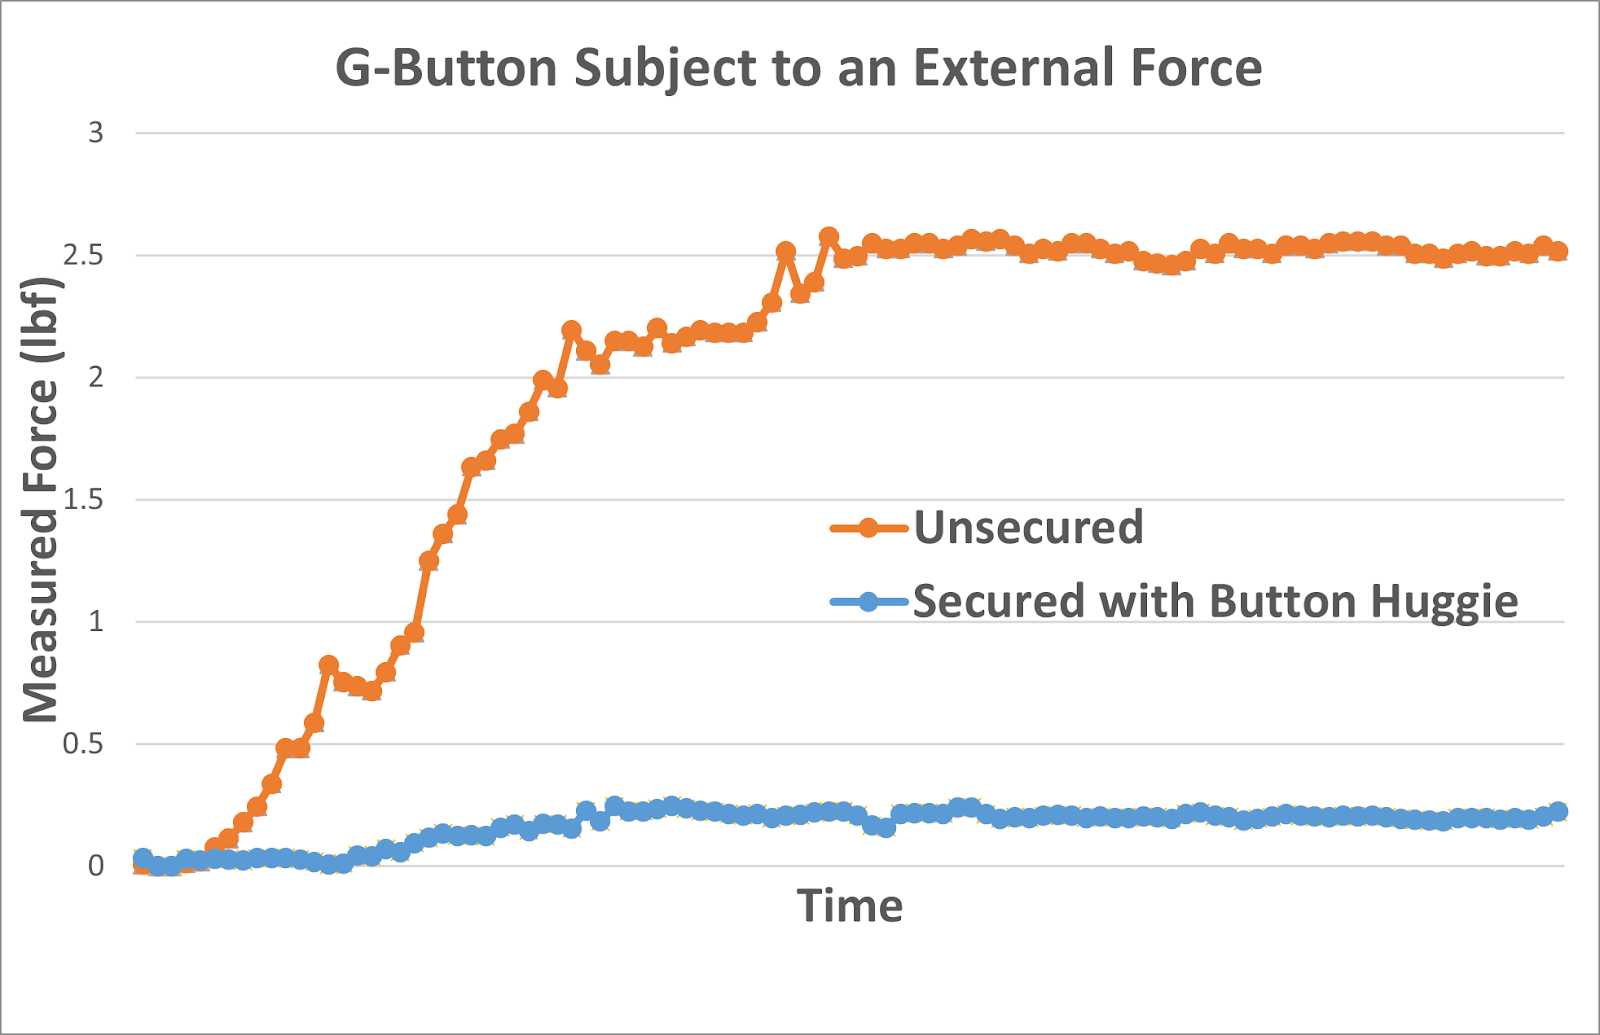
One of the most important roles of the Button Huggie® is to provide 360° of protection from external forces. In our testing, we found that the Button Huggie® reduces external forces on the g-button by up to 90%.
This means that if a hand were to accidentally strike the g-button with 10lbs of force, and the g-button is secured with the Button Huggie®, the actual force exerted upon the g-button would be reduced to only 1 lb.
24/7 Protection
Another feature of the Button Huggie® is its ability to provide around-the-clock securement for the g-button, even during feedings. Because the g-button’s main function is to act as a long-term nutrition delivery system, it is important that the Button Huggie® accommodate attachment of the feeding tube to the g-button without sacrificing securement. To do this, there is an opening on the top of the lid that allows connecting the extension feeding tube to the g-button without opening the lid. Once feeding time is over, the extension tube can be removed and the feeding port recapped.

Intelligently Designed

In order to minimize movement of the g-button in the gastrostomy tract, which can be painful, the gastrostomy button must be stabilized when attaching or removing the extension feeding tube. To achieve this, “edge grippers” were designed inside the base layer. When the lid is closed and pinched, the internal structure of the lid engages the inner template of the base layer, which stabilizes the g-button, limiting movement in the gastrostomy tract.
The Button Huggie Difference
| Feature | Current Approach | The Button Huggie |
|---|---|---|
| 360 degree protection | ||
| External Force Reduction | ||
| Protection While Feeding | ||
| Painless Gauze Replacement | ||
| Dislodgement Prevention | ||
| G-Button Stabilization |
Instructions
Click here to download/print PDF versions of the Button Huggie Instruction Guide.
Applying the Button Huggie
Listed below are the necessary steps in order to apply Ezalife's Button Huggie gastrostomy securement device.
Time Needed: 3 minutes
Required items:
Steps to apply button huggie:

Clean the skin around the g-button with soap and water and make sure the skin is dry. Importantly:
- Use soap and water to remove substances that contain emollients or oils, such as moisturizers or adhesive tape removers.
- To protect at-risk skin (neonates, infants, etc.), 3M® Cavilon® No Sting Barrier Film should be applied to the skin around the gastrostomy site. Using Cavilon™ will allow the adhesive layer to more easily lift from the skin when it’s time to remove it.
")
Remove the lid and base layers from their packaging. Attach the lid to the base by sliding the hinge of the lid under the rear of the base layer and press them together; you should hear an audible “click”, confirming the lid is properly attached.


Peel the adhesive backing away from sticky side. Do not to touch the adhesive.

Using the lid as a handle, align the base layer over the g-button, and slowly lower the device onto the skin.

Apply firm pressure to ensure good contact with the skin, so that moisture cannot slip between the two and loosen the adhesive.

Grasp the sides of the cotton gauze with the thumb and index finger of each hand and slip the gauze underneath the g-button. Be sure to push the gauze all the way in, so that the round front edge of the gauze sits inside the rounded front edge of the base layer and the gauze pad surrounds the g-button.

Push the lid down until it snaps onto the front edge of the base layer.

Insert the feeding port cap into the feeding port.

Changing the Gauze Pad
Listed below are the necessary steps in order to replace Ezalife's custom gauze pad for the Button Huggie gastrostomy button securement device.
Time Needed: 1 minutes
Required items:
Steps to replace Gauze pad:


Insert a new gauze pad under the g-button. Be sure to push the gauze all the way in, so that the round front edge of the gauze sits inside the rounded front edge of the base layer.

Attaching the feeding tube extension
Listed below are the necessary steps in order to attach a feeding tube extension to a gastrostomy button using Ezalife's Button Huggie.
Steps to replace attach feeding tube extension:

Grasp the sides of the device with your thumb and index finger. This stabilizes the g-button and prevents it from pressing into your child’s abdomen. Be sure to squeeze the sides of the Button Huggie in, and to not push down into the abdomen.

While stabilizing the g-button (step 2), align the black line of the extension feeding tube with the black line of the g-button feeding port. Insert into the g-button.

Turn the extension feeding tube clockwise at least 90 degrees to lock it into the feeding port.

Still have questions?
Our team is ready to help in any way we can. Chat with one of our experts today!